In the Settings window, click the profile for which you want to configure the antivirus protection for Android devices.
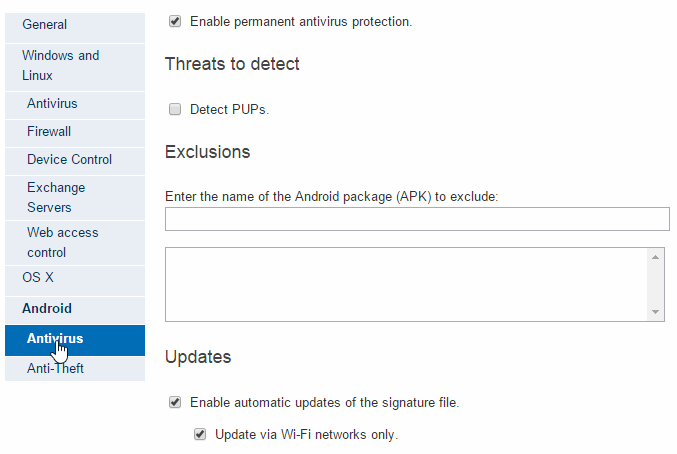
Then, click the Antivirus option in the Android section:

Select the option to enable the antivirus protection.
Select the relevant checkbox for the antivirus to detect potentially unwanted programs (PUP).
The Android protection allows you to exclude any of the apps installed from the scans.
Enter the name of the Android package (.apk) that you want to exclude and click Add.
Use the Delete and Clear buttons to clear or edit the contents of the list of exclusions.
You can choose to update the signature file automatically. Additionally, you can choose to update the protection exclusively through Wi-Fi networks.
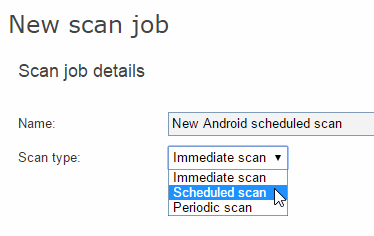
To schedule a scan, click the New button.
Use the options in the New scan job window to configure the scan type: immediate, scheduled or periodic. �

As you create scan tasks, these will appear on the list of scheduled scans for the profile whose antivirus protection you are configuring.You can edit or delete them from there.
Immediate scan
Once you have configured the scan, it will take place as soon as the device connects to the server.
Scheduled scan
The scan will take place at the configured date and time. For that to happen, you need to configure the scan sufficiently in advance. If there is no connection to the server at the scheduled date and time, the scan will take place as soon as the connection is re-established.
Periodic scan
The scan will take place at the date and time that you set in the corresponding fields with the corresponding frequency.
As with scheduled scans, it is advisable to configure periodic scans sufficiently in advance to ensure there is connection with the server. Otherwise, the scan will take place as soon as the connection is re-established.