User management
To manage users and their permissions, select Users from the Other options area:
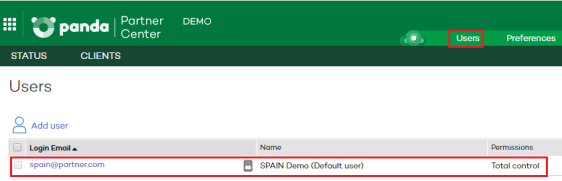
Adding a user
To create a user:
Select Users from the Other options area. Click the Add user link and enter the required data:
-
Login email: This is used as the user name.
-
Comments: Here you can add additional information.
-
Permissions: Select the permissions you want to assign to the user. For more information, see section Types of permissions.
-
Client groups: Select the client groups/subgroups the user will be able to take action on. Users with total control permissions can act on all groups.
If you create a user with permissions on a group and all of its subgroups, and later you add a new subgroup to it, the user is automatically granted permissions on that subgroup as well. If you create a user with permissions on some subgroups in a group, and later you add a new subgroup to it, the user is NOT automatically granted permissions on the new subgroup.
-
Click Add. A message appears informing you that an email message has been sent to the address specified when you created the user.
After you create the user, it appears on the list shown in the Users section.
Editing a user data
Select Users from the Other options area. Click the name of the user whose data you want to edit. The Edit users page opens. You can edit this data:
-
The text entered in the Comments field.
-
The type of permissions.
-
The group the user belongs to.
In the case of the primary or default user, you can edit only the contents of the Comments field.
Editing a user account authorization information
-
For partners belonging to the Panda Security security provider: To edit the name, password, email address, or two-factor authentication status of a user, go to Panda Cloud (https://www.pandacloudsecurity.com).
-
For partners belonging to the WatchGuard security provider: To edit the name, password, email address, or two-factor authentication status of a user, go to https://watchguard.com.
For more information, see chapter The Panda account.
Deleting a user
To delete a user:
-
Select Users from the Other options area. Select the checkbox next to the user you want to delete.
-
To delete all users, select the checkbox located at the top of the table, next to the Login email column.
-
Click the Delete button.
Note that you cannot delete either the default user or the active user (the user whose credentials you have used to access the web console).
Requiring two-factor authentication
From the moment you require two-factor authentication in the organization, the console user must have an additional device and a code generator program, such as WatchGuard AuthPoint, to access the console.
To require two-factor authentication for all users that access the Partner Center console:
-
From the top menu, select Users. A page opens that shows a list of all users created in Partner Center.
-
Select the checkbox Require users to have two-factor authentication enabled to access this account. If the user account that enables the feature does not have two-factor authentication enabled, a warning message appears. See Enabling two-factor authentication.
When you enable two-factor authentication, any user that is logged in to the console is logged out and must log back in using two-factor authentication.
Enabling two-factor authentication
To enable two-factor authentication in a Partner Center user account:
-
Download the WatchGuard AuthPoint app for free from https://play.google.com/store/apps/details?id=com.watchguard.authpoint (for Android) or from https://apps.apple.com/app/watchguard-authpoint/id1335115425 (for iOS).
-
Go to Panda Cloud:
-
For partners belonging to the Panda Security security provider: Enter your partner credentials at https://www.pandacloudsecurity.com.
-
For partners belonging to the WatchGuard security provider: Enter your partner credentials at https://watchguard.com.
-
-
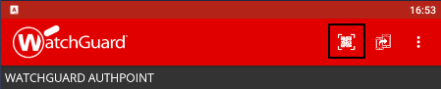
Click the
 icon in the upper-right corner of the page. A menu appears.
 -
Select Set up my profile. The Panda Account page opens.
-
From the left panel, select Login. Click the Enable link. The Synchronization using an authentication app dialog box opens.
-
If this is your first time using the WatchGuard AuthPoint app on your mobile device, tap the Activate button. If you have used it before, tap the QR icon in the upper-right corner. Your device camera opens.
-
Point the camera on your device at the QR code in the Partner Center console. A new entry is added in WatchGuard AuthPoint and the app generates a one-time token every 30 seconds.
-
Enter the code generated by WatchGuard AuthPoint in the Partner Center console to link the device to your user account. Click the Verify button. A dialog box opens that shows the message Two-factor authentication is enabled.
-
Click OK. After this, the console user is required to enter an email address, a password, and the token generated by WatchGuard AuthPoint before they are able to access the console.